Usage
You can find the source code of examples here
One column
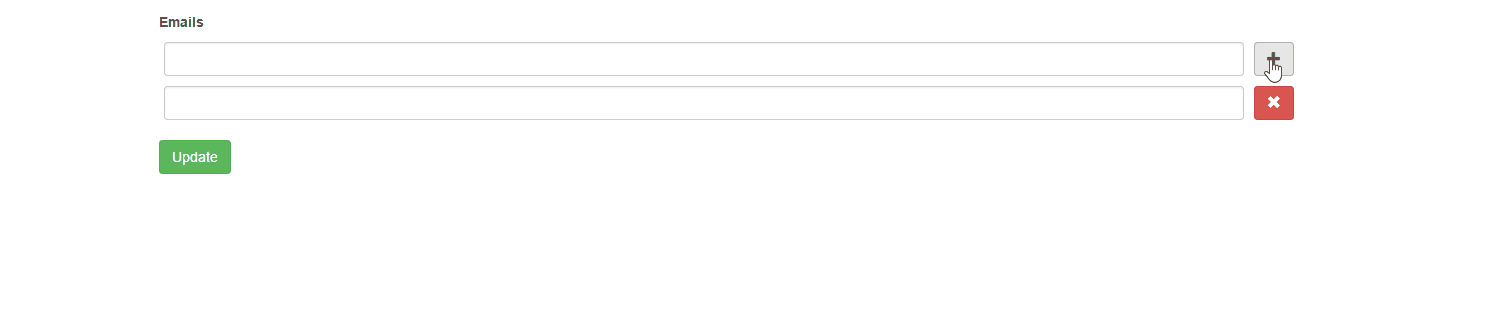
For example, your application contains the model User that has the related model UserEmail You can add virtual attribute emails for collect emails from a form and then you can save them to the database.
In this case, you can use yii2-multiple-input widget for supporting multiple inputs how to describe below.
First of all, we have to declare a virtual attribute in the model
class ExampleModel extends Model
{
    /**
     * @var array virtual attribute for keeping emails
     */
    public $emails;
Then we have to use MultipleInput widget for rendering form field in the view file
use yii\bootstrap\ActiveForm;
use unclead\multipleinput\MultipleInput;
use unclead\multipleinput\examples\models\ExampleModel;
use yii\helpers\Html;

/* @var $this \yii\base\View */
/* @var $model ExampleModel */
?>

<?php $form = ActiveForm::begin([
    'enableAjaxValidation'      => true,
    'enableClientValidation'    => false,
    'validateOnChange'          => false,
    'validateOnSubmit'          => true,
    'validateOnBlur'            => false,
]);?>

<?= $form->field($model, 'emails')->widget(MultipleInput::className(), [
    'max' => 4,
 ]);
?>
<?= Html::submitButton('Update', ['class' => 'btn btn-success']);?>
<?php ActiveForm::end();?>
Options max means that a user is able to input only 4 emails
For validation emails, you can use the following code
    /**
     * Email validation.
     *
     * @param $attribute
     */
    public function validateEmails($attribute)
    {
        $items = $this->$attribute;

        if (!is_array($items)) {
            $items = [];
        }

        foreach ($items as $index => $item) {
            $validator = new EmailValidator();
            $error = null;
            $validator->validate($item, $error);
            if (!empty($error)) {
                $key = $attribute . '[' . $index . ']';
                $this->addError($key, $error);
            }
        }
    }
Multiple columns
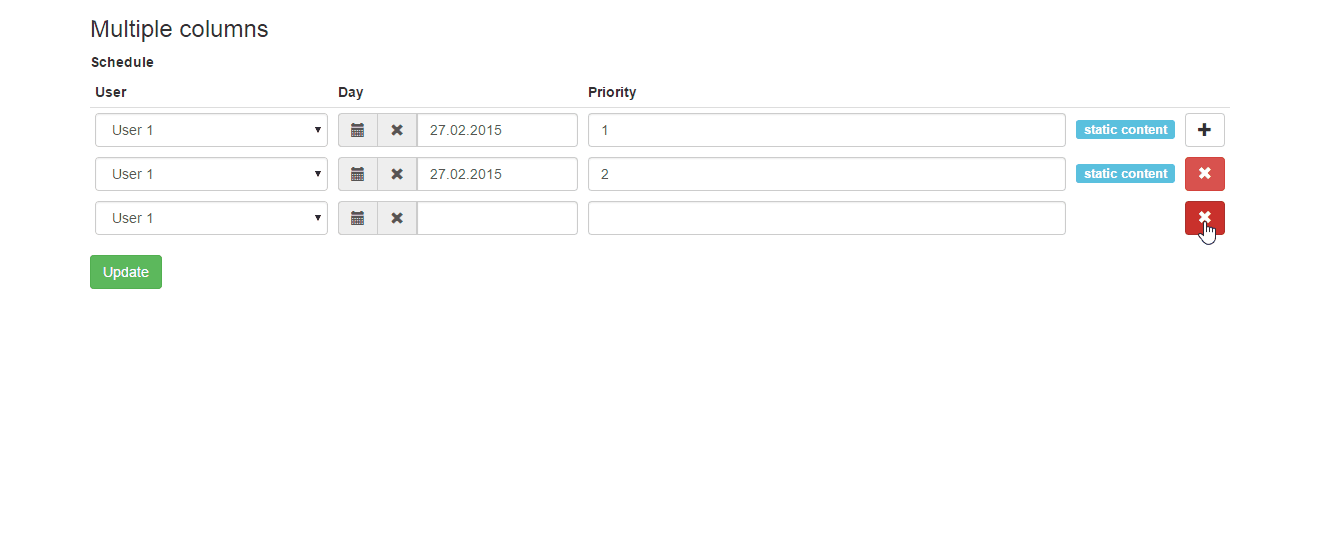
For example, you want to have an interface for manage a user schedule. For simplicity, we will store the schedule in json string.
In this case, you can use yii2-multiple-input widget for supporting multiple inputs how to describe below.
Our test model can look like as the following snippet
class ExampleModel extends Model
{
    public $schedule;

    public function init()
    {
        parent::init();

        $this->schedule = [
            [
                'day'       => '27.02.2015',
                'user_id'   => 1,
                'priority'  => 1
            ],
            [
                'day'       => '27.02.2015',
                'user_id'   => 2,
                'priority'  => 2
            ],
        ];
    }
Then we have to use MultipleInput widget for rendering form field in the view file
use yii\bootstrap\ActiveForm;
use unclead\multipleinput\MultipleInput;
use unclead\multipleinput\examples\models\ExampleModel;
use yii\helpers\Html;

/* @var $this \yii\base\View */
/* @var $model ExampleModel */
?>

<?php $form = ActiveForm::begin([
    'enableAjaxValidation'      => true,
    'enableClientValidation'    => false,
    'validateOnChange'          => false,
    'validateOnSubmit'          => true,
    'validateOnBlur'            => false,
]);?>

<?= $form->field($model, 'schedule')->widget(MultipleInput::className(), [
    'max' => 4,
    'columns' => [
        [
            'name'  => 'user_id',
            'type'  => 'dropDownList',
            'title' => 'User',
            'defaultValue' => 1,
            'items' => [
                1 => 'User 1',
                2 => 'User 2'
            ]
        ],
        [
            'name'  => 'day',
            'type'  => \kartik\date\DatePicker::className(),
            'title' => 'Day',
            'value' => function($data) {
                return $data['day'];
            },
            'items' => [
                '0' => 'Saturday',
                '1' => 'Monday'
            ],
            'options' => [
                'pluginOptions' => [
                    'format' => 'dd.mm.yyyy',
                    'todayHighlight' => true
                ]
            ]
        ],
        [
            'name'  => 'priority',
            'title' => 'Priority',
            'enableError' => true,
            'options' => [
                'class' => 'input-priority'
            ]
        ]
    ]
 ]);
?>
<?= Html::submitButton('Update', ['class' => 'btn btn-success']);?>
<?php ActiveForm::end();?>
For validation of the schedule you can use the following code
    public function validateSchedule($attribute)
    {
        $requiredValidator = new RequiredValidator();

        foreach($this->$attribute as $index => $row) {
            $error = null;
            $requiredValidator->validate($row['priority'], $error);
            if (!empty($error)) {
                $key = $attribute . '[' . $index . '][priority]';
                $this->addError($key, $error);
            }
        }
    }
For example, you keep some data in json format in an attribute of a model. Imagine that it is an abstract user schedule with keys: user_id, day, priority
On the edit page, you want to be able to manage this schedule and you can you yii2-multiple-input widget like in the following code
use unclead\multipleinput\MultipleInput;

...

<?= $form->field($model, 'schedule')->widget(MultipleInput::className(), [
    'max' => 4,
    'columns' => [
        [
            'name'  => 'user_id',
            'type'  => 'dropDownList',
            'title' => 'User',
            'defaultValue' => 1,
            'items' => [
                1 => 'User 1',
                2 => 'User 2'
            ]
        ],
        [
            'name'  => 'day',
            'type'  => \kartik\date\DatePicker::className(),
            'title' => 'Day',
            'value' => function($data) {
                return $data['day'];
            },
            'items' => [
                '0' => 'Saturday',
                '1' => 'Monday'
            ],
            'options' => [
                'pluginOptions' => [
                    'format' => 'dd.mm.yyyy',
                    'todayHighlight' => true
                ]
            ],
            'headerOptions' => [
                'style' => 'width: 250px;',
                'class' => 'day-css-class'
            ]
        ],
        [
            'name'  => 'priority',
            'enableError' => true,
            'title' => 'Priority',
            'options' => [
                'class' => 'input-priority'
            ]
        ],
        [
            'name'  => 'comment',
            'type'  => 'static',
            'value' => function($data) {
                return Html::tag('span', 'static content', ['class' => 'label label-info']);
            },
            'headerOptions' => [
                'style' => 'width: 70px;',
            ]
        ]
    ]
 ]);
?>
Tabular input
For example, you want to have an interface for manage some abstract items via tabular input.
In this case, you can use yii2-multiple-input widget for supporting tabular input how to describe below.
Our test model can look like as the following snippet
namespace unclead\multipleinput\examples\models;

use Yii;
use yii\base\Model;
// you have to install https://github.com/vova07/yii2-fileapi-widget
use vova07\fileapi\behaviors\UploadBehavior;

/**
 * Class Item
 * @package unclead\multipleinput\examples\models
 */
class Item extends Model
{
    public $title;
    public $description;
    public $file;
    public $date;

    public function behaviors()
    {
        return [
            'uploadBehavior' => [
                'class' => UploadBehavior::className(),
                'attributes' => [
                    'file' => [
                        'path' => Yii::getAlias('@webroot') . '/images/',
                        'tempPath' => Yii::getAlias('@webroot') . '/images/tmp/',
                        'url' => '/images/'
                    ],
                ]
            ]
        ];
    }

    public function rules()
    {
        return [
            [['title', 'description'], 'required'],
            ['file', 'safe']
        ];
    }
}
Then we have to use TabularInput widget for rendering form field in the view file
Since version 2.18.0 you can configure columnOptions also.
<?php

use yii\bootstrap\ActiveForm;
use unclead\multipleinput\TabularInput;
use yii\helpers\Html;
use \unclead\multipleinput\examples\models\Item;

/* @var $this \yii\web\View */
/* @var $models Item[] */
?>

<?php $form = \yii\bootstrap\ActiveForm::begin([
    'id'                        => 'tabular-form',
    'enableAjaxValidation'      => true,
    'enableClientValidation'    => false,
    'validateOnChange'          => false,
    'validateOnSubmit'          => true,
    'validateOnBlur'            => false,
    'options' => [
        'enctype' => 'multipart/form-data'
    ]
]) ?>

<?= TabularInput::widget([
    'models' => $models,
    'attributeOptions' => [
        'enableAjaxValidation'      => true,
        'enableClientValidation'    => false,
        'validateOnChange'          => false,
        'validateOnSubmit'          => true,
        'validateOnBlur'            => false,
    ],
    'columns' => [
        [
            'name'  => 'title',
            'title' => 'Title',
            'type'  => \unclead\multipleinput\MultipleInputColumn::TYPE_TEXT_INPUT,
        ],
        [
            'name'  => 'description',
            'title' => 'Description',
        ],
        [
            'name'  => 'file',
            'title' => 'File',
            'type'  => \vova07\fileapi\Widget::className(),
            'options' => [
                'settings' => [
                    'url' => ['site/fileapi-upload']
                ]
            ],
            'columnOptions' => [
                'style' => 'width: 250px;',
                'class' => 'custom-css-class'
            ]
        ],
        [
            'name'  => 'date',
            'type'  => \kartik\date\DatePicker::className(),
            'title' => 'Day',
            'options' => [
                'pluginOptions' => [
                    'format' => 'dd.mm.yyyy',
                    'todayHighlight' => true
                ]
            ],
            'headerOptions' => [
                'style' => 'width: 250px;',
                'class' => 'day-css-class'
            ]
        ],
    ],
]) ?>


<?= Html::submitButton('Update', ['class' => 'btn btn-success']);?>
<?php ActiveForm::end();?>
Your action can look like the following code
/**
 * Class TabularInputAction
 * @package unclead\multipleinput\examples\actions
 */
class TabularInputAction extends Action
{
    public function run()
    {
        Yii::setAlias('@unclead-examples', realpath(__DIR__ . '/../'));

        $models = [new Item()];
        $request = Yii::$app->getRequest();
        if ($request->isPost && $request->post('ajax') !== null) {
            $data = Yii::$app->request->post('Item', []);
            foreach (array_keys($data) as $index) {
                $models[$index] = new Item();
            }
            Model::loadMultiple($models, Yii::$app->request->post());
            Yii::$app->response->format = Response::FORMAT_JSON;
            $result = ActiveForm::validateMultiple($models);
            return $result;
        }

        if (Model::loadMultiple($models, Yii::$app->request->post())) {
            // your magic
        }


        return $this->controller->render('@unclead-examples/views/tabular-input.php', ['models' => $models]);
    }
}